Lesson 3: The 3 Branches of Government
Teacher: Brittany Hughes
Grade Level: 4th grade Subject Area: Social Studies
Time Needed: 2 Class Periods Topic: 3 Branches of Government
Essential Questions:
Lesson Goals:
MMSD Standards:
NCSS Standards:
Materials Needed:
Lesson Context: This is the third lesson in a series of lessons from a Wisconsin Government Unit. This lesson is taught after students have learned about citizens and taxes. This lesson attempts to allow students to keep tying in what they learned in these first lessons into the material for this lesson. This is the students’ first class time exposure to the actual Wisconsin Government structure and system.
Lesson Opening: Read the 3rd chapter of the book Class President to the students in the back of the room. Discuss the events of the book including what happened in this chapter; what the students think will happen next, why they think this etc. Also continue to tie in how the characters were good citizens. Have the word government written on the back of the board. Ask students what they know about government. Accept many answers and right them on the small board as students provide them. Push students to think about what they know about who runs are government, the type of government Wisconsin or the United States has, what the government does for citizens, etc. Thank students for their insights and inform them that we are now going to use the textbook to help clarify and organize our current knowledge of government.
Procedures:
ii. As the teacher stand in the middle of the circle.
iii. Tell students that we need to come up with a physical representation for each branch of government with their bodies.
iv. Encourage students to come up with a physical movement for each branch. (Examples could be executive: stand tall with your hands on your hips and stomp your feet to represent authority, judicial: move your arms up and down as to be pounding a gavel, and legislative: perform a hand movement which represents writing)
v. Tell students that you are going to call out a specific way for them to start moving around the circle. For example you could have them walk slowly, fast, hop, tip toe, skip, etc. Then as they are moving you are going to call out a duty or official from one of the 3 branches of government. Tell the students it is then their duty to begin doing the corresponding movement we came up with.
vi. Tell students that after they are moving around the circle for a few moments you will say stop and point to somebody. You are then going to ask them what branch movement they are performing and why. The class will then agree or disagree. This student who answered will then move to the middle of the circle and give students a new movement to complete followed by one of the duties/officials from the envelope.
vii. Remind students that it is okay if they are having trouble remembering what branch it is, but it is important to continue to move so that the circle will keep moving smoothly.
viii. If students have troubles remembering the specific branch for a description open up discussion with the students to why the description is part of the specific branch.
ix. After all of the duties/officials have been read have students return to their seats and put the room back together.
Lesson Closure/Assessment: Have the students fill out the Exit Slip: “Why is it important for citizens to know about their government?” Collect responses before/as students leave the room. Read through responses to reflect on the lesson and how much the students took away from it.
EXIT SLIP:
Why is it important for citizens to know about their government?
_______________________________________________________
_______________________________________________________
_______________________________________________________
_______________________________________________________
Grade Level: 4th grade Subject Area: Social Studies
Time Needed: 2 Class Periods Topic: 3 Branches of Government
Essential Questions:
- What is government and how does it affect citizens?
- What is the structure of Wisconsin’s government? How is the government structured?
- What are the duties of each branch of government and who is in charge of each branchof government?
Lesson Goals:
- Students will fill out a worksheet and discuss the three branches of government and the duties and members of each branch.
- Students will work cooperatively with their group members various times throughout the lesson to complete tasks together in a positive manner.
- Students will use movements to identify different duties of the executive, legislative, and judicial branches of the Wisconsin government.
- Students will create visual representations of the three branches of government and the characteristics of each group with their peers.
MMSD Standards:
- Political Science and Citizenship: Standard 4: Identify the characteristics of responsible citizenship.
NCSS Standards:
- Standard 3: People, Places, and Environments
- Standard 4: Individual Development and Identity
- Standard 5: Individuals, groups, and Institutions
- Standard 10: Civic Ideals and Practices
Materials Needed:
- Class President book
- The WI Journey text book
- Chalkboard/dry erase board
- 3 Branches of Government Worksheet
- Names of officials
- 1 Envelope with examples of branch duties and officials cut up for movement activity
- 1 Tree for each group
- 1 envelope of cut up terms for each group
- Cards with branch of government written on them
- Any other art supplies available (glue, markers, other paper, etc)
- Exit Slip
- District Maps
Lesson Context: This is the third lesson in a series of lessons from a Wisconsin Government Unit. This lesson is taught after students have learned about citizens and taxes. This lesson attempts to allow students to keep tying in what they learned in these first lessons into the material for this lesson. This is the students’ first class time exposure to the actual Wisconsin Government structure and system.
Lesson Opening: Read the 3rd chapter of the book Class President to the students in the back of the room. Discuss the events of the book including what happened in this chapter; what the students think will happen next, why they think this etc. Also continue to tie in how the characters were good citizens. Have the word government written on the back of the board. Ask students what they know about government. Accept many answers and right them on the small board as students provide them. Push students to think about what they know about who runs are government, the type of government Wisconsin or the United States has, what the government does for citizens, etc. Thank students for their insights and inform them that we are now going to use the textbook to help clarify and organize our current knowledge of government.
Procedures:
- Have students go back to their desks. Give each student a copy of the textbook, The WI Journey. Read out loud pages 152 to 154 to the students.
- While reading ask students questions relating to each branch. Ex. Who is the head of our executive branch, what the different tasks of each branch discussed in the reading really mean, show them WI assembly map so they can see how many districts there are, why they think we have 3 branches of government, etc.
- After reading is complete, have students compare these officials to the United States Government. Ask who is in charge of each branch. Have the names and pictures of all the WI and US officials on paper and stick them on the board as students come up with them. This will provide students with a visual to help them make sense of the leaders of each branch and will allow them to compare the Wisconsin government leaders to the national government leaders. This might help students make a connection and understand the role and tasks of each branch more by comparing the different people.
- Pass out the 3 branches of government worksheet to each pod. Allow the members of each pod to use their book and prior knowledge to fill out the worksheet together.
- Inform students that you still want to give them pay checks for their hard work if they complete tasks for you. Let students know that you will once again give each pod of 4 5 raccoon dollars (while taking out 1 raccoon dollar for taxes from each pod) if they work cooperatively. Ask students to define this word. Accept answers and remind students that this means to work nicely together using team work and positive attitudes. Tell students that if all members of the group are not working together cooperatively the whole pod will not get a paycheck. Remind students of this by writing the words “Cooperative Work = 5 Raccoon Dollars” on the board. In addition walk around during the work time to make sure that groups are staying on task and working together. If students have questions about the worksheet help them.
- Come back together as a class and fill out the worksheet on the overhead. Accept student answers for each of the three columns. The students should supply answers for what the different tasks/duties are of each branch. Discuss what each duty means as students volunteer them. For example, if the student says that the Executive Branch can pass or veto bills ask then discuss what exactly this means. Also be sure to point out how each branch has specific duties. Ask students why they think that there are three branches and not only one with a head member who does everything. Accept answers and push students to realize that the different branches balance and check one another so that not one branch or person has all the power. Also push students to say that there is a lot that needs to be done to run our government, so the three branches divides this work up so that it can be done with attention.
- Hand out Raccoon Dollars to the groups that were working cooperatively. Say a way you saw each group that receives the dollars working cooperatively when you give them your paycheck. If you question whether a group should receive a paycheck ask them why they think they should or should not receive one. Thank them for their honesty and feedback and then make the decision whether or not they should receive one. Take out the 1 Raccoon Dollar from each paycheck and remind students you are using this tax money to pay for necessities of the room like you talked about in the previous lesson (including paying for things like electricity, the books and paper they used during the class, getting the room cleaned, etc).
- Tell students we are going to review the 3 branches in moving activity that will allow them to demonstrate their knowledge of the different tasks and duties of each branch.
- ACTIVITY:
ii. As the teacher stand in the middle of the circle.
iii. Tell students that we need to come up with a physical representation for each branch of government with their bodies.
iv. Encourage students to come up with a physical movement for each branch. (Examples could be executive: stand tall with your hands on your hips and stomp your feet to represent authority, judicial: move your arms up and down as to be pounding a gavel, and legislative: perform a hand movement which represents writing)
v. Tell students that you are going to call out a specific way for them to start moving around the circle. For example you could have them walk slowly, fast, hop, tip toe, skip, etc. Then as they are moving you are going to call out a duty or official from one of the 3 branches of government. Tell the students it is then their duty to begin doing the corresponding movement we came up with.
vi. Tell students that after they are moving around the circle for a few moments you will say stop and point to somebody. You are then going to ask them what branch movement they are performing and why. The class will then agree or disagree. This student who answered will then move to the middle of the circle and give students a new movement to complete followed by one of the duties/officials from the envelope.
vii. Remind students that it is okay if they are having trouble remembering what branch it is, but it is important to continue to move so that the circle will keep moving smoothly.
viii. If students have troubles remembering the specific branch for a description open up discussion with the students to why the description is part of the specific branch.
ix. After all of the duties/officials have been read have students return to their seats and put the room back together.
- Tell students that they did a great job with the physical representations of the three branches of government. Let the students know how impressed you were with their abilities to use movements to show the different branches. Tell students that they are now going to be constructing a tree of the three branches so that they will have visual representations of what they know as well. Together as a group of 3 they will be constructing a tree that describes what each branch of government does. They will be given terms and they must work together to put each term in the right section.
- Hand out cards with a branch of government on it. Have students get into groups by finding 2 classmates that have the other 2 branches on their cards.
- Hand out an envelope of terms and tree to each group.
- Tell students to work together to put all the terms on the tree. It is up to them as to how to do this. They can give each member of the group a branch to focus on finding the duties for or they all can work together to come
- Make it explicit to students that they are not to glue any terms onto the tree until the class has checked through it together. Until then they just need to place the term on the tree where they think it should go.
- When all the groups have their terms on the tree go over the answers together as a class. Have a teacher tree to use as a model on the front board and place the terms where they go as students tell you to provide an accurate visual for the students to reference.
- Once the correct placement has been given, give students glue and give them the opportunity to glue the terms on their trees however they like. They can also get creative with any art supplies in the room. Encourage students to add drawings, graphics, words, and symbols to each branch of the tree to represent that corresponding branch of government. Allow students to add anything that is meaningful to them and might help them remember the duties of each branch. Accept all student work and discuss any added elements that you see on the trees as you walk around and watch the students working.
- Allow students sufficient amount of time to really work on and make their trees unique and meaningful to them. Then go around and give each group the opportunity to show the class their trees. Allow each group time to discuss one element they added to the tree that they find particularly interesting and meaningful to them. Encourage students to be positive towards their classmates’ trees and clap after each group presents.
Lesson Closure/Assessment: Have the students fill out the Exit Slip: “Why is it important for citizens to know about their government?” Collect responses before/as students leave the room. Read through responses to reflect on the lesson and how much the students took away from it.
EXIT SLIP:
Why is it important for citizens to know about their government?
_______________________________________________________
_______________________________________________________
_______________________________________________________
_______________________________________________________
Three Branches of Government Worksheet

Branch Names and Duties
EXECUTIVE BRANCH
Governor Jim Doyle
Execute laws
Suggest bills
Prepares state budget
Sign bills into laws or vetoes
Head of state military
Grants pardons
JUDICIAL BRANCH
Chief Justice
Shirley Abrahamson
Justice Michael J. Gableman
Courts
Solve problems/disagreements about laws
Decides how people should be punished
Settles arguments
LEGISLATIVE BRANCH
Senate (33 Members) and Assembly (99 Members)
Make laws
Represent the people of their area
Senator Fred Risser
Assembly member Spencer Black
Assembly Member Terese Berceau
*Note official will change as elections occur and new members are elected into these positions. These officials were active members of their branch during October of 2010 when this unit was created.
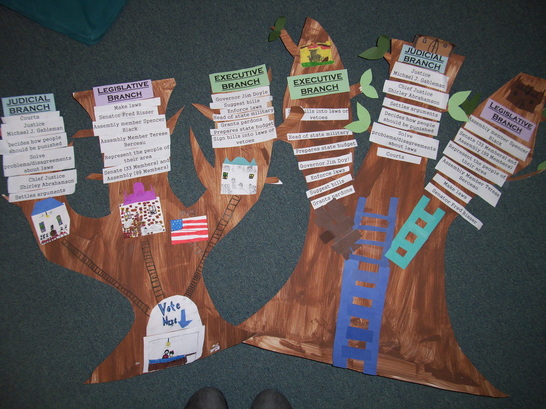
Two of the trees students in my 4th grade class created during this lesson.
